
|
back to www.audiodesignguide.com |
To get more information contact me at: webmaster@audiodesignguide.com |
WEGA V4810 / SONY TA5650 V-FET Amplifiers
The my friend Alessandro after reading positive comments on various forums about older amps that use Sony V-FET has purchased a pair of these.
The VFET were used from 1974 to 1981 mainly in equipment produced by
Sony and Yamaha and these have a so good sound characteristics that
they have become a myth among audiophiles.
After doing a first series of listening sessions with these amplifiers we are
convinced of the quality of the sound reproduced by these devices.
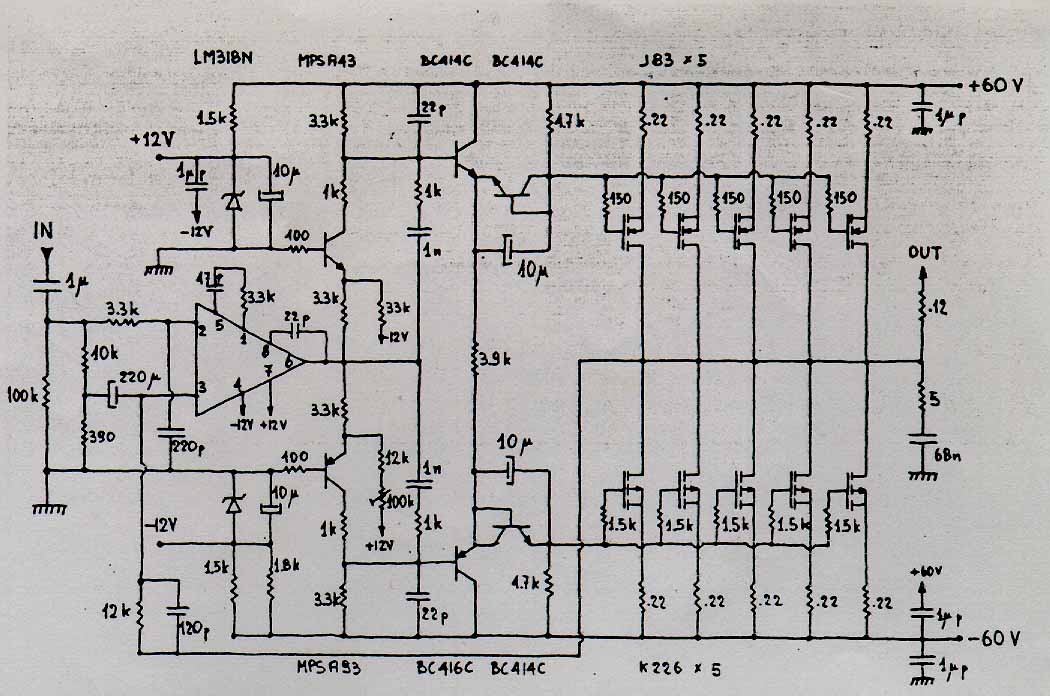
Another special feature of these amplifiers is the mosfet drain output on the final stage instead of the most common source output.
This configuration, also used in some old
Musical Fidelity amplifiers, prevents the alternating mosfet
switch-off so the amplifier work with characteristics similar to
class A but without high bias.
I am not a lover of the upgrade made on vintage equipments, in
fact I hate these for many reasons such as: difficulty to find
materials after a fault, almost impossibility to replicate the
project and the changes of materials after a long time.
I have already created a source for my friend with my last DAC so I decided to undertake this upgrade and I hope that everything goes without problems.
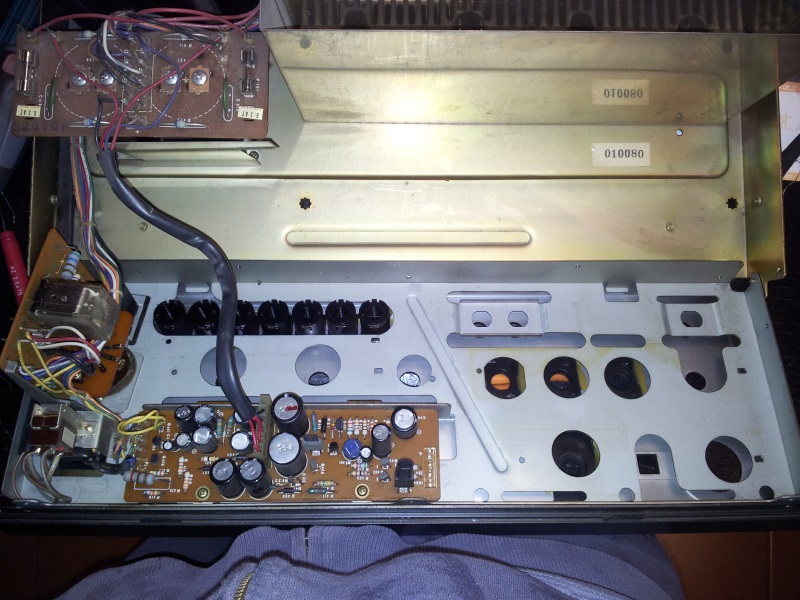
We started with a Wega Integrated Stereo Amplifier V4810, very similar to Sony TA5650, in which we had to remove all the unnecessary parts, leaving only the volume control and the final section.
The space obtained by the elimination of the pre-ampl. section and tone controls will be used to create a CLC power supply in order to reduce the noise derived from the current peaks on the rectification diodes.
Follows a photo of the original version before the upgrade.
Step 1 - remove all the unnecessary parts
I have removed all modules relative to the pre-ampl. section and
input selection, only one wire must be cut for this operation.

Step 2 - create new panels
To keep the same external look I have created two panels to fix 4 regulators without wire and this allow to keep the knobs.


Step 3 - convert the power supply in CLC
The original power supply use a pair of 10000uF 50V Nichicon
capacitors with about 300mVrms ripple.
The new power supply use a pair of Hammond 159ZJ chokes and a pair
of 10000uF 50V Nichicon KG Super Through.
Each channel receive a separated power supply +VCC and -VCC at 44V
and a regulated +VDD and -VDD at 80V for
the mosfet drivers so keep attention.
All the parts has been found is these web shop.
The CLC power supply skip any noise problem and it is superior to any pure
capacitor design also if large value are used.
In the following simulations with PSU Designer II you can see the big difference
in residual noise, with CLC type we get
a pure sine wave so it mean low harmonics.


The Hammond
159ZJ (L=10mH
Rdc=0.16ohm Imax=5A) used in this amplifier are not difficult to integrate in
any amplifier
because these have a compact size and these are not expensive.


Step 4 - insert ALPS volume control
I have decided with Alessandro to use a common ALPS 50K but if the budget is not a problem use a DACT stepper attenuator.

Step 5 - modify input cap
There is a single capacitor on the signal path so must be of extreme
high quality, the original value is 10uF 100V but this work at about
0.7V-1.4V.
Probably Sony have used 100V to be sure to separate the source in
case of transistor fault but it is practically impossible that the
first transistor of a mosfet amplifier go in fault and the
base go to +VCC.
I have used a Sanyo OS-CON 10uF 6.3V to keep the low frequency band
to 0.2Hz like original but you can use one 1uF or 2.2uF if you
prefer.
I consider good MKP only the Auricap or Jantzen Z-CAP red so there
is no space to mount these and please forget Solen, Mundorf, Audyn-Cap,
Wima.

Step 6 - re cabling outputs
I have replaced the output cable with CS16 to eliminate the output selection on the signal path, the relay must be used to keep the protection.
Follows a photo of the new version after the upgrade, new wooden sides will be realized in the short solid wood.

Here the total cost of this operation, many parts got from Audiokit webshop
| description | number | unit price | tot price |
| Cable KS675 | 2 | 6 | 12 |
| Cable CS16 black | 2 | 4 | 8 |
| Cable CS16 red | 2 | 4 | 8 |
| Hammond 159ZJ | 2 | 22 | 44 |
| Capacitors KG 10000uF 50V | 2 | 15 | 30 |
| Sanyo OS-CON 10uF 10V | 2 | 3 | 6 |
| L aluminum 40mm x 1.5mm | 1 | 5 | 5 |
| ALPS RK27 50K | 1 | 11 | 11 |
| total | 125 |
Soon comments on listen test by Alessandro.